
Setting Up a Telegram WEB Proxy with tproxy-server and Katabump
What is this?
Since version 7.1, Telegram Desktop has a new proxy type called WEB. It disguises your traffic as an ordinary website visit, which makes it much harder to detect and block.
This guide shows how to set up this proxy type completely for free on a free host like Katabump.
Sites you'll need
Before starting, you'll need accounts on the following sites:
1. Katabump Link: control.katabump.com A free host that offers a Python/Node.js plan. This is where the project actually runs.
2. Orihost (alternative to Katabump, optional) Link: orihost.com A free host similar to Katabump, with the same kind of plan. Use this if Katabump isn't available to you.
3. Cloudflare Link: dash.cloudflare.com Used to create the tunnel and get around your host's port restrictions.
4. Termux Link: termux.dev A terminal app for Android. You'll use it to build the required binaries on your phone.
5. A domain registrar (if you want to buy your own domain) Link: namecheap.com For buying a cheap, unused domain -- see Filtering notes for why this matters.
6. DigitalPlat FreeDomain (a free alternative to buying a domain) Link: dash.domain.digitalplat.org A free subdomain registration service, for when buying a domain isn't an option yet.
7. tproxy-server repository Link: github.com/telegramdesktop/tproxy-server Telegram's own official implementation of this proxy type.
8. mtg repository Link: github.com/9seconds/mtg The software that actually understands and relays real Telegram traffic.
Prerequisites
- A Katabump account (or similar) with a Python/Node.js plan
- A free Cloudflare account (only required for a custom domain, not for Quick Tunnel)
- Termux on an Android phone
- A domain (buying one is recommended -- see Filtering notes)
Overall architecture
Internet
   │
   ▼
Cloudflare
   │
   ▼
main.py (on your host)
   ├── decoy site      <- looks like a normal website
   ├── tproxy-server   <- HTTPS disguise layer
└── mtg <- real Telegram backendEvery request that reaches your domain first hits tproxy-server. If it doesn't carry a valid Telegram token, it's silently shown the decoy site. If it does, it's handed off to mtg, which understands real Telegram traffic.
Recommended method: run the script
Our recommendation
Instead of doing every step by hand (installing packages, compiling tproxy-server and mtg, writing the config files), there's a ready-made script that does all of this for you. For most users this is the simplest and fastest route.
Just run this one command in Termux:
curl -fsSL -o build-web-proxy.sh https://raw.githubusercontent.com/mehdi-hexing/mehdi-hexing/refs/heads/main/docs/public/web-proxy-setup/build-web-proxy.sh && bash build-web-proxy.shThis script:
- Installs the required packages (only if they aren't already installed)
- Compiles
tproxy-serverandmtg v1 - Asks you for the domain, tunnel mode, secret and
MTG_PUBLIC_IPV4, and writes them straight intoconfig.json,profiles.jsonandcf-config.ymlitself -- no need to edit those files by hand afterward - Downloads
main.pyand copies the binaries in alongside everything else - Prints a table of everything you entered or that was generated for you at the end, so you can double-check it before uploading (the same table is also saved as
SETTINGS-SUMMARY.txtinside the project folder) - Leaves a complete, ready-to-upload folder in your phone's Downloads (
Download/web-proxy-project/) when it's done - Is safe to re-run — steps that already finished aren't repeated
Automatic upload via SFTP (optional)
At the end of the run, the script asks:
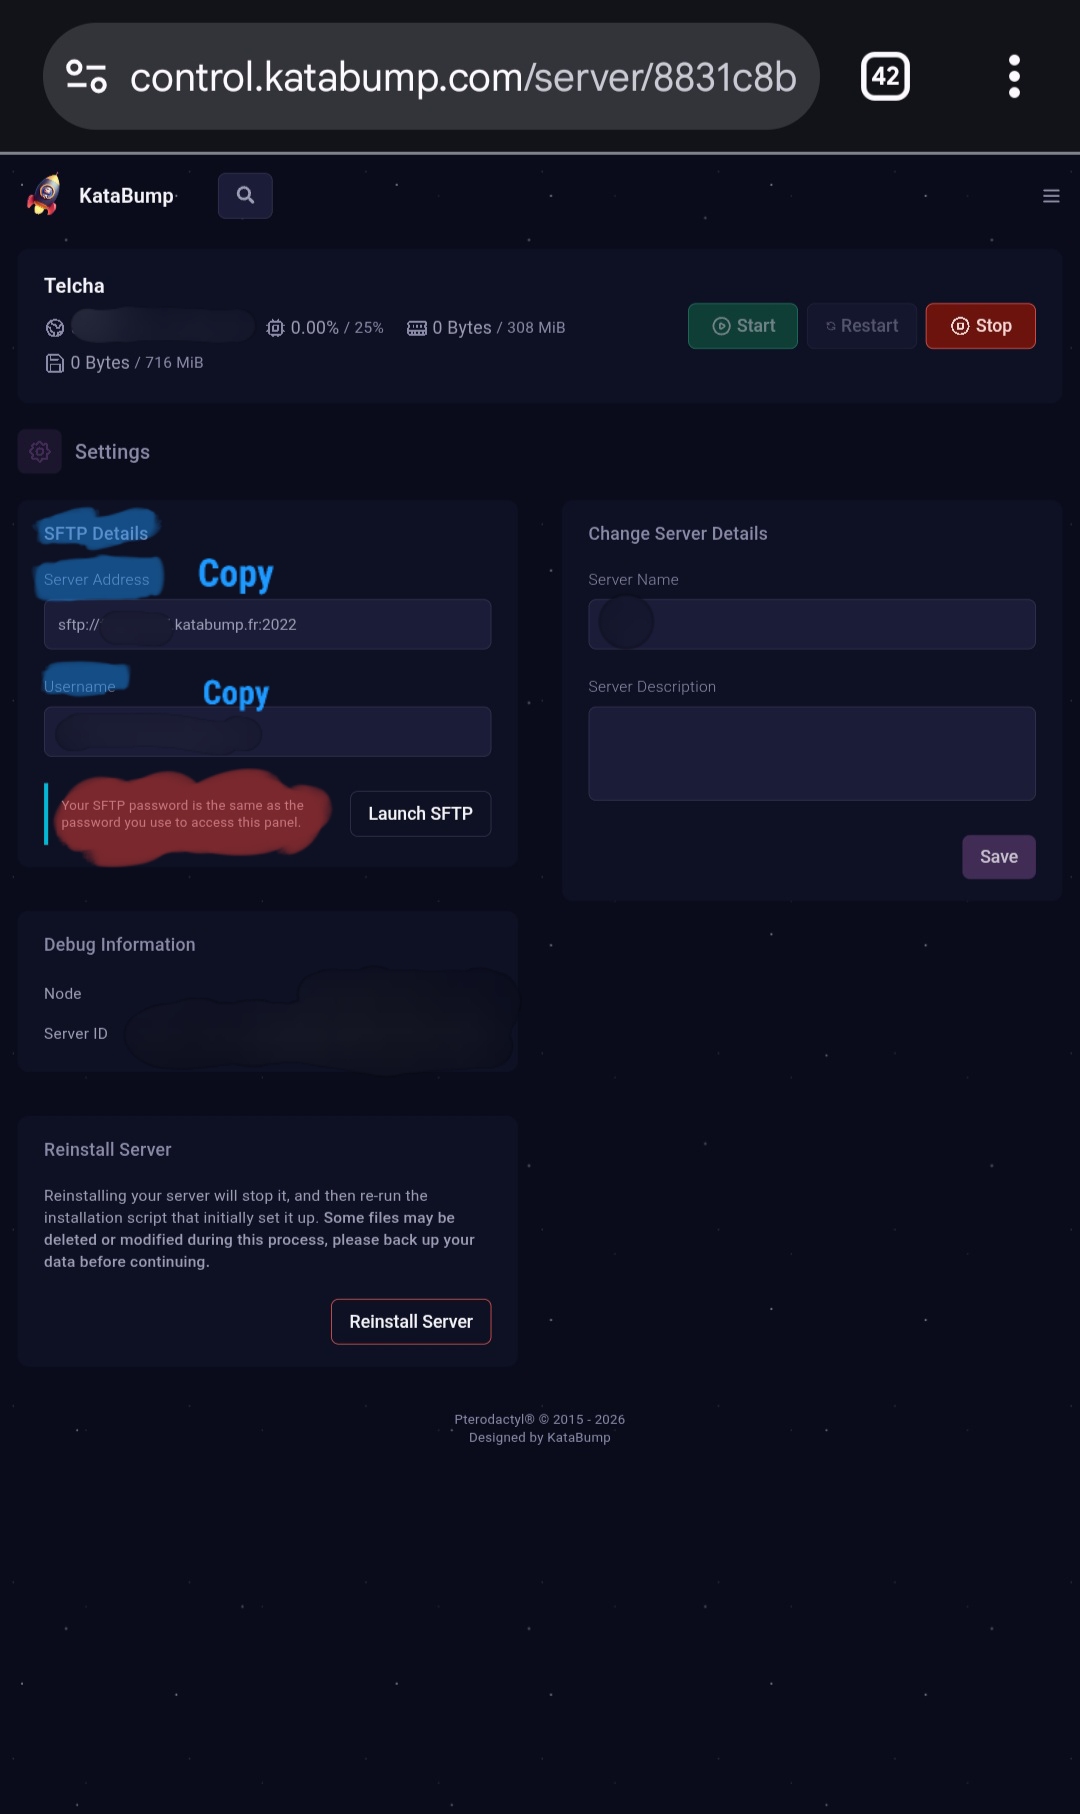
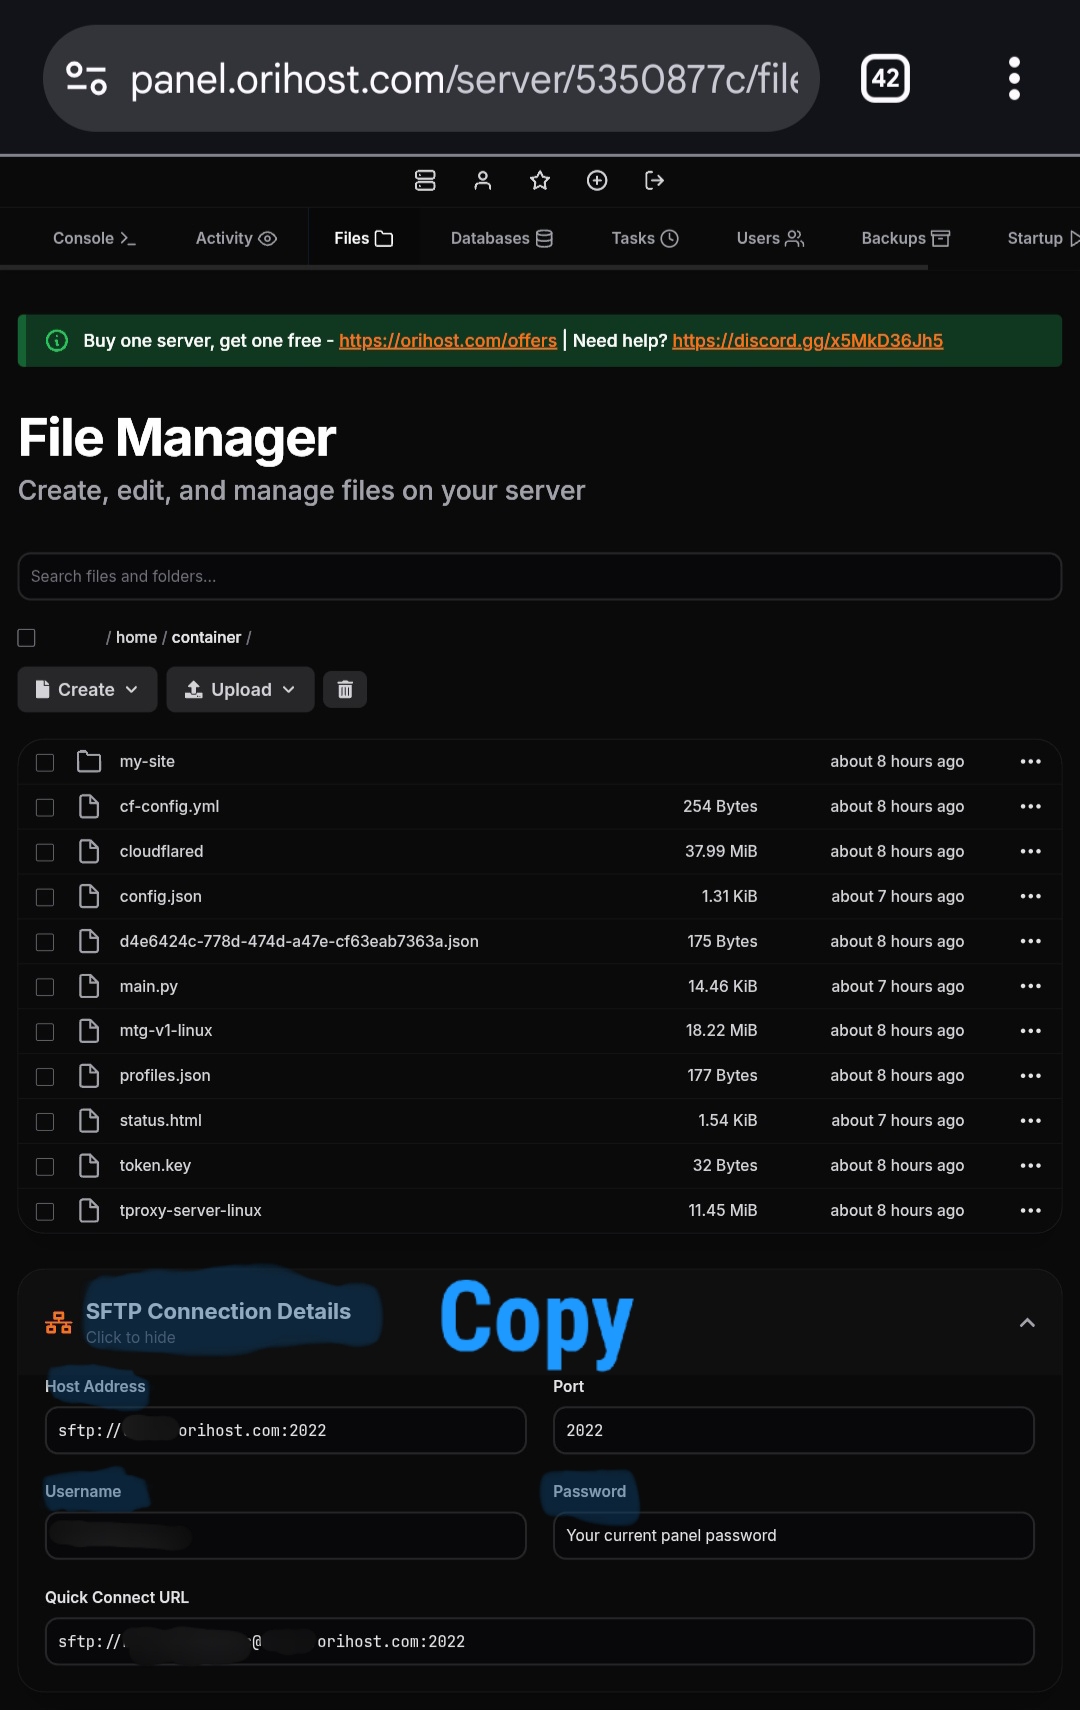
Do you have SFTP/SSH access to Katabump and want to upload now? [y/N]If you answer y, it asks you to paste the SFTP address exactly as your panel shows it (e.g. sftp://user.katabump.fr:2022). It parses the host and port from that automatically, and if the address already includes a username (as on Orihost), it won't ask for one separately. The password is your panel password, which the upload command itself will prompt for when it connects.
Finding your SFTP details:
Katabump: open the hamburger menu (☰) at the top-left of the panel and go to Settings -- the SFTP address and username are there.
Orihost: scroll to the Files section near the bottom of the page and open SFTP Connection Details.
📷 Pic 1/2 :
📷 Pic 2/2 :
If you answer n (or just press Enter), this step is skipped and you just get the ready folder in Downloads to upload by hand through the panel's web File Manager.
Manual method (only if you want to do it yourself)
Open this section only if you'd rather go step by step manually
If you already ran the script above, you don't need to read this — skip straight to Which files do you need to edit yourself.
Step 1: Install Termux prerequisites
pkg update && pkg upgrade
pkg install golang git openssl-tool cloudflared opensshStep 2: Build tproxy-server
git clone https://github.com/telegramdesktop/tproxy-server.git
cd tproxy-server
CGO_ENABLED=0 GOOS=linux GOARCH=amd64 go build -trimpath -buildvcs=false \
-o ../tproxy-server-linux ./cmd/tproxy-serverStep 3: Build mtg
git clone https://github.com/9seconds/mtg.git mtg-v1
cd mtg-v1
git checkout v1.0.12
CGO_ENABLED=0 GOOS=linux GOARCH=amd64 go build -trimpath -buildvcs=false \
-o ../mtg-v1-linux .Step 4: Generate a secret
openssl rand -hex 16The output is a 32-character string. You'll put this in profiles.json in the next step, and use the same value in the final Telegram link.
Step 5: Set up the config files
config.json
{
  "public_hostname": "your-domain.example.com",
  "base_path": "",
  "listen": "127.0.0.1:8080",
  "admin_listen": "127.0.0.1:8081",
  "public_upstream": "http://127.0.0.1:3000",
  "token_key_file": "./token.key",
  "static_routes": "exact",
  "profiles_file": "./profiles.json",
  "enable_pprof": false,
  "limits": {
    "max_sessions_global": 128,
    "max_streams_global": 4096
  },
  "timeouts": {
    "backend_dial": "5s",
    "long_poll": "25s",
    "reconnect_grace": "2m",
    "idle": "75s"
  }
}Only change the public_hostname line to your own domain; leave the rest as is.
profiles.json
{
  "profiles": [
    {
      "name": "primary",
      "secret": "REPLACE_WITH_YOUR_OWN_32_HEX_SECRET",
      "backend": "127.0.0.1:2398",
      "carrier_mode": "https"
    }
  ]
}Only change the secret line to the value you generated in Step 4.
cf-config.yml (only if you have your own domain)
tunnel: tproxy
credentials-file: ./YOUR-TUNNEL-UUID.json

ingress:
  - hostname: your-domain.example.com
    service: http://localhost:8080
    originRequest:
      httpHostHeader: your-domain.example.com
- service: http_status:404If you're using Quick Tunnel mode (next step), you don't need this file at all.
A simple decoy site
You'll also need a plain index.html -- any ordinary page works, it just needs to look like a real website.
Step 6: Pick a tunnel mode
There are two ways to connect your server to the internet:
Quick Tunnel (simplest, no domain needed)
No sign-up required. Great for quick testing, but the link changes every time you restart the server.
Named Tunnel (stable, needs your own domain)
A fixed address on your own domain -- the link always stays the same.
:::
Which files do you need to edit yourself?
If you used the script
The script already asked you for these and wrote them straight into the files -- this table is mainly for the manual method, or for double-checking everything landed correctly (which is also what the script's own summary table at the end does).
| File | What to change |
|---|---|
profiles.json | the secret field |
config.json | the public_hostname field |
cf-config.yml (Named Tunnel only) | hostname, credentials-file, httpHostHeader |
my-site/index.html | the page content (any simple HTML) |
MTG_PUBLIC_IPV4 env var | the IP:PORT your panel assigned you |
QUICK_TUNNEL env var | 1 for Quick Tunnel mode, empty for Named Tunnel |
Files you should never create or edit by hand: token.key and status.html -- the script generates these itself.
Run it on Katabump
The following files need to be in your project's root folder:
main.py
config.json
profiles.json
cf-config.yml
tproxy-server-linux
mtg-v1-linux
cloudflared
my-site/index.htmlSet PY FILE in the Katabump panel
In the Katabump panel, go to the Startup section, find the PY FILE field, and change it to main.py -- otherwise the panel won't know which file to run.
To run with Quick Tunnel You Should to Change Python Code QUICK_TUNNEL Value From 0 to --> ("QUICK_TUNNEL", "1") :
# auto-detects it and rewrites config.json + status.html each time.
QUICK_TUNNEL = os.environ.get("QUICK_TUNNEL", "0") == "1"
QUICK_TUNNEL_URL_RE = re.compile(r"https://([a-zA-Z0-9.-]+\.trycloudflare\.com)")To run with a Named Tunnel:
python /home/container/main.pyFiltering and domain notes
Some carriers block well-known free subdomain services (like dpdns.org, ggff.net, filegear-sg.me) at the DNS level, regardless of what's actually running behind them. Based on that experience, here's the recommended order of options:
1. Buy your own domain (best option)
The most reliable path. A domain with no history (even a cheap TLD like .xyz or .online) has a much better chance of getting through filtering.
2. Cloudflare Quick Tunnel
If buying a domain isn't an option right now, trycloudflare.com (Cloudflare's own domain) is the next best choice. The only downside is that the link changes every time you restart the server.
3. DigitalPlat FreeDomain
You can register a free subdomain (.us.kg, .qzz.io, .qd.je, .xx.kg) at dash.domain.digitalplat.org.
Use caution
dpdns.org -- which got blocked in our tests -- belongs to this same provider. Test it on your actual network before relying on it.
Common troubleshooting
| Error | Fix |
|---|---|
unknown field "_comment" | Only keep documented fields in your JSON files |
profiles.json permission errors | The script fixes this automatically |
token_key_file: no such file | The script generates this once, automatically |
incorrect first byte of secret | Make sure you're using mtg v1, not v2 |
cannot resolve any public address | Set the MTG_PUBLIC_IPV4 variable |
| Client stuck on "Connecting..." | Make sure public_hostname exactly matches your real domain |
Help and support
Need more help?
If you run into any questions or issues, here's where to go:
- Official project docs: tproxy-server on GitHub
- The mtg project: 9seconds/mtg
Additional details (for the curious)
Why is CGO_ENABLED=0 needed?
When compiling with Go on Termux, if CGO is enabled, the compiler tries to build parts of the code with a C toolchain matching your phone's own architecture (ARM), while your server needs an amd64 build. This causes strange compile errors. CGO_ENABLED=0 skips that step entirely and gives you a clean cross-compile.
Why does it have to be mtg v1, specifically?
Version 2 only accepts FakeTLS secrets (the ones starting with ee), while tproxy-server only accepts classic or dd-prefixed secrets. The two aren't compatible, so you need version 1, which supports the classic format.
Why was httpHostHeader needed in cf-config.yml?
tproxy-server decides whether a request is real Telegram traffic or just an ordinary visitor based on the Host header. You need to make sure Cloudflare always forwards your actual domain as the Host header, not something else.
Why does mtg need a public IP?
mtg needs to know its own publicly reachable address to talk to Telegram's own middle proxies. On free hosts like Katabump, which sit behind an internal network layer, it can't guess this on its own -- so it has to be given explicitly via MTG_PUBLIC_IPV4.